Developer Guide
- Acknowledgements
- User profile and value proposition
- Non-functional requirements
- Setting up, getting started
- Design
- Implementation
- Documentation, logging, testing, configuration, dev-ops
- Appendix: Requirements
- Appendix: Instructions for manual testing
- Appendix: Planned Enhancements
Acknowledgements
- {list here sources of all reused/adapted ideas, code, documentation, and third-party libraries – include links to the original source as well}
User profile and value proposition
The product is intended for insurance agents, advertisers or anyone in adjacent roles to manage their customers’ information efficiently.
Users will enjoy the advantages of a command-line interface, as managing contacts can be done more quickly by typing, while a graphical user interface allows the user to visualise their contacts intuitively.
Non-functional requirements
This application should be usable on mainstream OSes as long as Java 11 is installed.
The application should be sufficiently easy to use, that the average owner of a desktop computer should be able to use it efficiently.
Setting up, getting started
Refer to the guide Setting up and getting started.
Design
.puml files used to create diagrams in this document can be found in the diagrams folder. Refer to the PlantUML Tutorial at se-edu/guides to learn how to create and edit diagrams.
Architecture
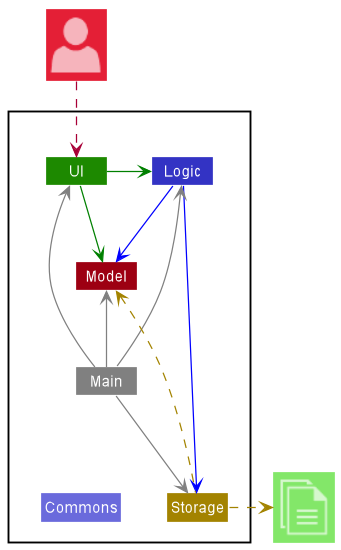
The Architecture Diagram given above explains the high-level design of the App.
Given below is a quick overview of main components and how they interact with each other.
Main components of the architecture
Main has two classes called Main and MainApp. It is responsible for,
- At app launch: Initializes the components in the correct sequence, and connects them up with each other.
- At shut down: Shuts down the components and invokes cleanup methods where necessary.
Commons represents a collection of classes used by multiple other components.
The rest of the App consists of four components.
-
UI: The UI of the App. -
Logic: The command executor. -
Model: Holds the data of the App in memory. -
Storage: Reads data from, and writes data to, the hard disk.
How the architecture components interact with each other
The Sequence Diagram below shows how the components interact with each other for the scenario where the user issues the command delete 1.
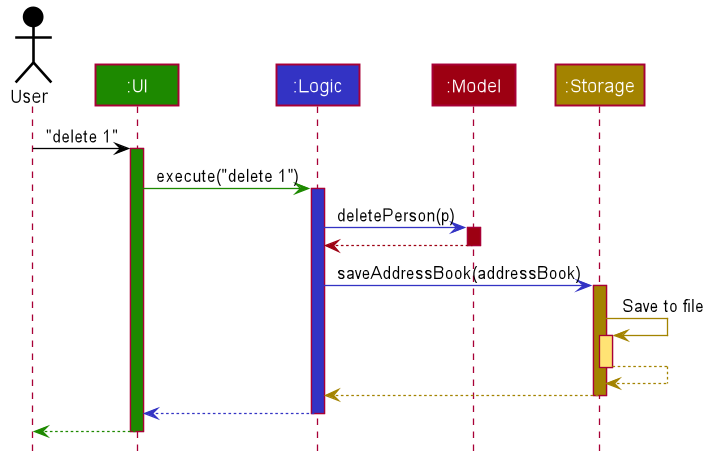
Each of the four main components (also shown in the diagram above),
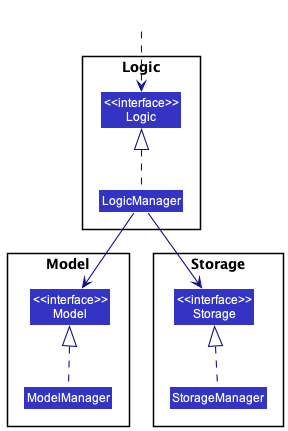
- defines its API in an
interfacewith the same name as the Component. - implements its functionality using a concrete
{Component Name}Managerclass (which follows the corresponding APIinterfacementioned in the previous point.
For example, the Logic component defines its API in the Logic.java interface and implements its functionality using the LogicManager.java class which follows the Logic interface. Other components interact with a given component through its interface rather than the concrete class (reason: to prevent outside component’s being coupled to the implementation of a component), as illustrated in the (partial) class diagram below.
The sections below give more details of each component.
UI component
The API of this component is specified in Ui.java
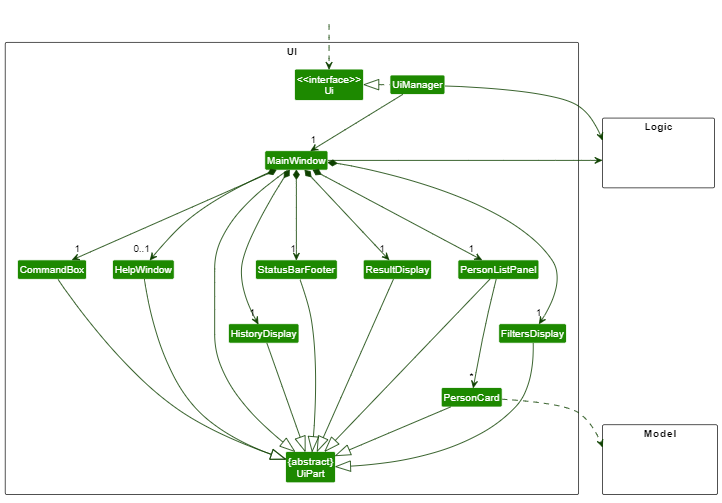
The UI consists of a MainWindow that is made up of parts e.g.CommandBox, ResultDisplay, PersonListPanel, StatusBarFooter etc. All these, including the MainWindow, inherit from the abstract UiPart class which captures the commonalities between classes that represent parts of the visible GUI.
The UI component uses the JavaFx UI framework. The layout of these UI parts are defined in matching .fxml files that are in the src/main/resources/view folder. For example, the layout of the MainWindow is specified in MainWindow.fxml
The UI component,
- executes user commands using the
Logiccomponent. - listens for changes to
Modeldata so that the UI can be updated with the modified data. - keeps a reference to the
Logiccomponent, because theUIrelies on theLogicto execute commands. - depends on some classes in the
Modelcomponent, as it displaysPersonobject residing in theModel.
Logic component
API : Logic.java
Here’s a (partial) class diagram of the Logic component:
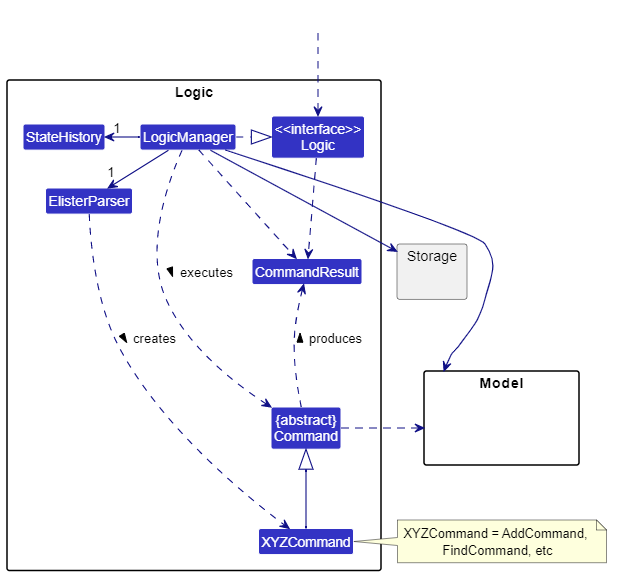
How the Logic component works:
- When
Logicis called upon to execute a command, it uses theEListerParserclass to parse the user command. - This results in a
Commandobject (more precisely, an object of one of its subclasses e.g.,AddCommand) which is executed by theLogicManager. - The command can communicate with the
Modelwhen it is executed (e.g. to add a person). - The result of the command execution is encapsulated as a
CommandResultobject which is returned back fromLogic.
The Sequence Diagram below illustrates the interactions within the Logic component for the execute("delete 1") API call.
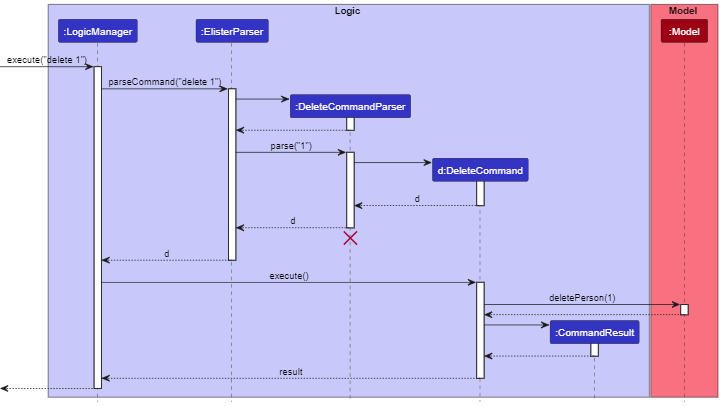
DeleteCommandParser should end at the destroy marker (X) but due to a limitation of PlantUML, the lifeline reaches the end of diagram.
Here are the other classes in Logic (omitted from the class diagram above) that are used for parsing a user command:

How the parsing works:
- When called upon to parse a user command, the
EListerParserclass creates anXYZCommandParser(XYZis a placeholder for the specific command name e.g.,AddCommandParser) which uses the other classes shown above to parse the user command and create aXYZCommandobject (e.g.,AddCommand) which theEListerParserreturns back as aCommandobject. - All
XYZCommandParserclasses (e.g.,AddCommandParser,DeleteCommandParser, …) inherit from theParserinterface so that they can be treated similarly where possible e.g, during testing.
Model component
API : Model.java
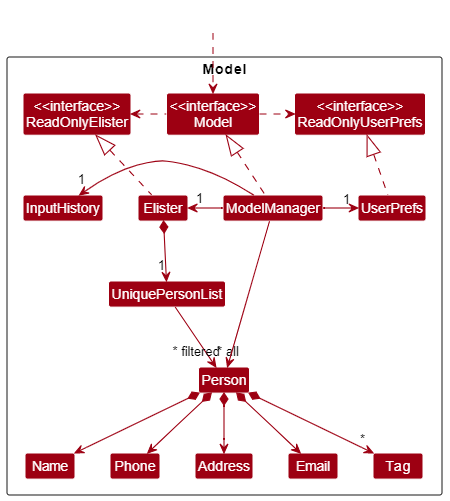
The Model component,
- stores the address book data i.e., all
Personobjects (which are contained in aUniquePersonListobject). - stores the currently ‘selected’
Personobjects (e.g., results of a search query) as a separate filtered list which is exposed to outsiders as an unmodifiableObservableList<Person>that can be ‘observed’ e.g. the UI can be bound to this list so that the UI automatically updates when the data in the list change. - stores a
UserPrefobject that represents the user’s preferences. This is exposed to the outside as aReadOnlyUserPrefobjects. - does not depend on any of the other three components (as the
Modelrepresents data entities of the domain, they should make sense on their own without depending on other components)
Tag list in the ELister, which Person references. This allows ELister to only require one Tag object per unique tag, instead of each Person needing their own Tag objects.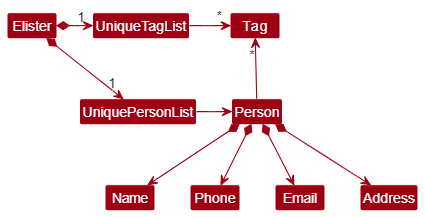
Storage component
API : Storage.java

The Storage component,
- can save both address book data and user preference data in json format, and read them back into corresponding objects.
- inherits from both
EListerStorageandUserPrefStorage, which means it can be treated as either one (if only the functionality of only one is needed). - depends on some classes in the
Modelcomponent (because theStoragecomponent’s job is to save/retrieve objects that belong to theModel)
Common classes
Classes used by multiple components are in the seedu.elister.commons package.
Implementation
This section describes some noteworthy details on how certain features are implemented.
Undo/Redo
The undo command supports:
- Reverting the most recent
Commandthat affected theModelstate (by changing aPersonwithin it or its list of displayedPersons). - Reverting a specified number of such
Commandsat once.
The redo command supports:
- Reinstating any undone
Command, or a specified number of suchCommands.
Implementation
Both commands operate using the StateHistory class, which is a container
that records - and can ultimately reconstruct - previous Model states.
Externally, StateHistory listens to the CommandResult of each executing command.
It also requires commands to declare two new fields in CommandResult:
-
affectsModel— Whether theCommandmodifiesModelby modifying a person or its list of displayed people. A command will be reverted upon anUndoif and only if this istrue. -
deterministic— Whether the modification toModelthat was just made byCommandwas the sole possible outcome of its execution.
By default, StateHistory points to the latest version of Model and offers a copy of its state.
This pointer can be moved backward or forward to retrieve copies of past states, or copies of undone future states:
-
StateHistory#undo(int n)— Moves the pointer n commands backward. -
StateHistory#redo(int n)— Moves the pointer n commands forward. -
StateHistory#presentModel()— Retrieves a copy of the pointer’sModelstate.
The Model objects produced by StateHistory#presentModel() are state-detached copies of the originals -
fields related to containing or displaying Persons are deep copies, whereas fields involving UI preferences
reuse the original objects (thus including any mutations done later).
StateHistory listens for CommandResults like so:
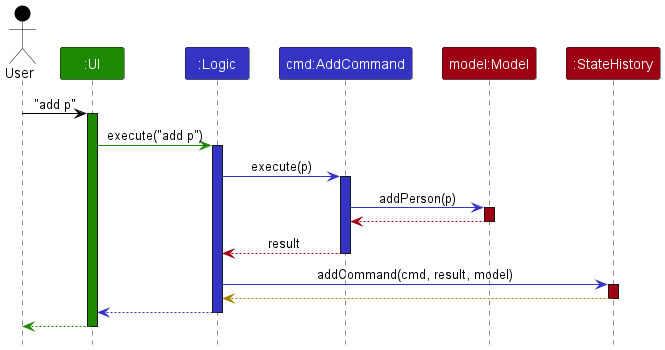
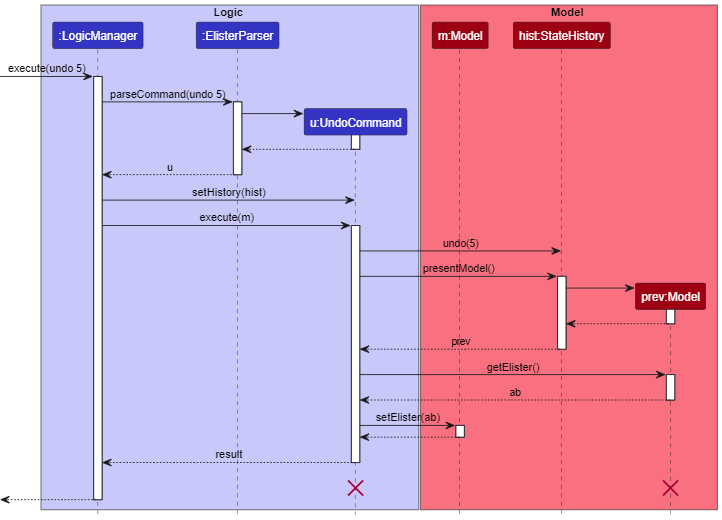
In turn, the sequence diagram of UndoCommand is:
Design considerations:
Given the inclusion of import and export commands, implementing a specific
reversal for each individual command was deemed impractical. Instead, the approach chosen was
to store previous Model states in their entirety.
However, to avoid excessive memory usage, only select seed copies of Model are actually stored.
Instead, previous Commands are also kept, and most Model states
are recreated by applying the relevant commands to seed states.
Seed states are captured
- upon program startup
- after a non-
deterministiccommand - every 10 commands, to avoid rerunning too many commands
These details are handled transparently by StateHistory.
Input Log
This is a GUI enhancement we implemented to provide users with more information. A new UI component HistoryDisplay was created along with some changes and additions to other high-level components (Model, Storage, Commons) in order to record the executed commands (noted that unsuccessfully executed inputs will not be recorded) and store it in a local .txt file and read from that .txt file and show to user.
Implementation
The feature implementation involves in almost all high-level components which are UI, Model, Storage and Commons:
-
HistoryDisplayclass in theUIencapsulates the visual display of the saved data onto the GUI. -
Historyclass in theModelrepresent the list of executed commands. -
TxtHistoryStorageandHistoryStoragefrom theStoragerepresents the.txtfile and the action of reading/writing from/to that file.
- Initially, when E-Lister is run, a new
TxtInputHistoryStoragewill be initialized along with other parts of high-level components. - Then, the history will be read from the
.txtfile after theElisteris read. - It will then be passed to
Logicwhere the users’ commands inStringtype are going to be executed and written into the.txtfile if the commands were succesfully executed. - After the execution, the new
Stringfrom.txtfile will be read and display the updated history list to the users.
Design Consideration:
- Instead of saving the history of commands in the same
.jsonfile, I personally believe that it would be better in this case to have a separate.txtfile to store the commands, it would be much more convenient and fewer methods invoking among high-level components because:- The expected behavior is that it displays exactly the commands that the user inputted before, so if we use
.txtfile, we only need to check the command is successfully executed before write the wholeStringcommand into thetxtfile. - On the other hand, using
.jsonfile would require a lot of data conversion which is likely to be more error-prone and theHistoryDisplayfrom theUimust trace throughLogic,Model,Storageto read the.jsonfile and vice versa since the data conversion happens inStorageorModel. Below is the code snippet inLogicManagerwhere the history is read.historyStringOptional = storage.readHistoryString(); if (!historyStringOptional.isPresent()) { logger.info("History file not found. Will be starting with the default file"); } initialHistory = new History(historyStringOptional.orElse(""));
- The expected behavior is that it displays exactly the commands that the user inputted before, so if we use
- Inspired by the
Optional<ReadOnlyAdressBookfrom the read and write process to the.jsonfile, I also implement the read/write process of history such that the content will be encapsulated with anOptional<String>instead ofString. This is useful sinceOptional<T>helps to avoidNullPointExceptionand also lead to cleaner codes.
Displaying filters that are currently applied
This is another GUI enhancement that is similar to the display of executed inputs from the previous section. Instead of displaying executed commands, this new UI component displays those filters that are applied on the contact list.
Implementation
In order to implement this new feature, there are some changes and additions to Ui, Model and Logic:
-
FiltersDisplayclass in theUiencapsulates the visual display of those applying filters. -
Filterclass in theModelrepresent a filter coming from user inputs with thefiltercommand.
A brief description of how E-Lister keep track of which filters are applied on its contact list is:
-
MainWindow#executeCommand()in theUiwill invoke a call toModelManager#getApplyingFilterList()and hence it will returns anObservableList<filter>and be passed intoFiltersDisplay#setApplyingFilters(). - A
ModelManagerobject keeps updating the list of filters to be shown to user along with itsfilteredPersonthroughModelManager#updateFilteredPersonList().
Creating shortcuts using the command shortcut
shortcut can be used to create user-defined shortcuts in order to input commands more quickly. This section will describe the implementation of this command, if the user enters shortcut edit e as an example.
Step 1. The user enters the command shortcut edit e and presses the Enter key. ElisterParser parses the user’s command and returns a ShortcutCommandParser.
Step 2. ShortcutCommandParser parses the user’s command, picking out the command that is to be shortened, and the shortcut to be added. A ShortcutCommand object is then added.
Step 3. The ShortcutCommand object is executed by MainWindow#executeCommand, returning a CommandResult. This signifies the completion of execution.
The following activity diagram summarizes what happens when a user executes this command:
Importing and Exporting CSV Files
This is a useful feature which allows users to export all contact details in a CSV File of their choice, or import an existing dataset.
Implementation
The implementation for import and export are found in ImportCommand and ExportCommand respectively. Once the execute(Model model) method is invoked, a FileChooser is displayed to the user. This file chooser has a FileChooser.ExtensionFilter applied to it, where the file description is “CSV Files” and the allowed file extension is “*.csv”.
Only for the import command, the system checks that the selected file is a valid CSV file. If it is invalid, an Alert is displayed to inform the user. This check is not required for the export command since users are allowed to write to a new file that does not yet exist.
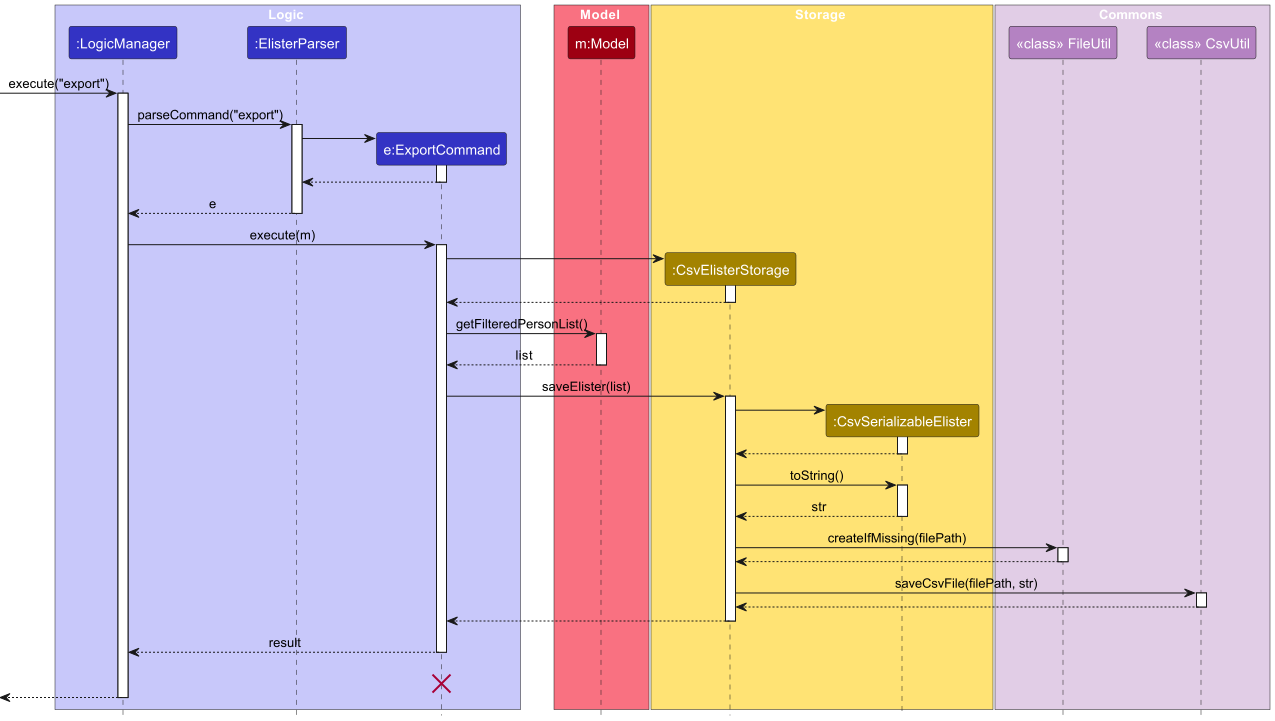
Beyond the UI level, the commands operate using the CsvElisterStorage class. This class interacts between the CsvUtil and CsvSerializableElister classes in order to convert between E-Lister data and a CSV-friendly format. The CsvSerializableElister class helps to convert each Person instance in the list to it’s corresponding CSV String and vice-versa. Using the export command for example, this interaction is illustrated in the following sequence diagram:
Export
Design Considerations
Given the complexity of the CSV file format, it was deemed impractical to support every single valid expression or notation which CSV allows. Instead, only two expressions were considered: the , and " symbols. Since CSV is comma-delimited, the following special considerations were made to handle these characters when converting from E-Lister to CSV-friendly format.
- If any number of
,appears in a field, the field must be wrapped with quotation marks"". - If a field is wrapped in quotation marks
""(such as due to the previous rule), any existing"within the field is converted to"".
The CsvUtil class provides a method to handle these rules:
public static String toCsvField(String str) {
   if (str.contains(",")) {
      str = str.replaceAll("\"", "\"\"");
      str = "\"" + str + "\"";
   }
   return str;
}
Tag feature
Implementation
The Tag mechanism is facilitated by ELister. It extends ELister with an Tag , stored internally as an Tag and Additionally, it implements the following operations:
-
ELister#Tag()— Adds a Tag to the person based on the index in the list.
These operations are exposed in the Model interface as Model#addTag()
Given below is an example usage scenario and how the tag mechanism behaves at each step.
Step 1. The user launches the application for the first time. The VersionedELister will be initialized with the initial address book state, and the currentStatePointer pointing to that single address book state.
Step 2. The user executes Tag 5 good command to Tag the 5th person in the address book with a new Tag good. The Tag command calls Model#addTag(), causing the modified state of the address book after the Tag 5 good command executes to be saved in the eListerStateList, and the currentStatePointer is shifted to the newly inserted address book state.

Mass feature
Implementation
The mass mechanism is facilitated by Elister. It extends tag/delete person/delete_tag /edit by providing a way to use those functions to the current list of people in the addressbook.
-
ELister#MassOp()— MassOp to every Person in the list.
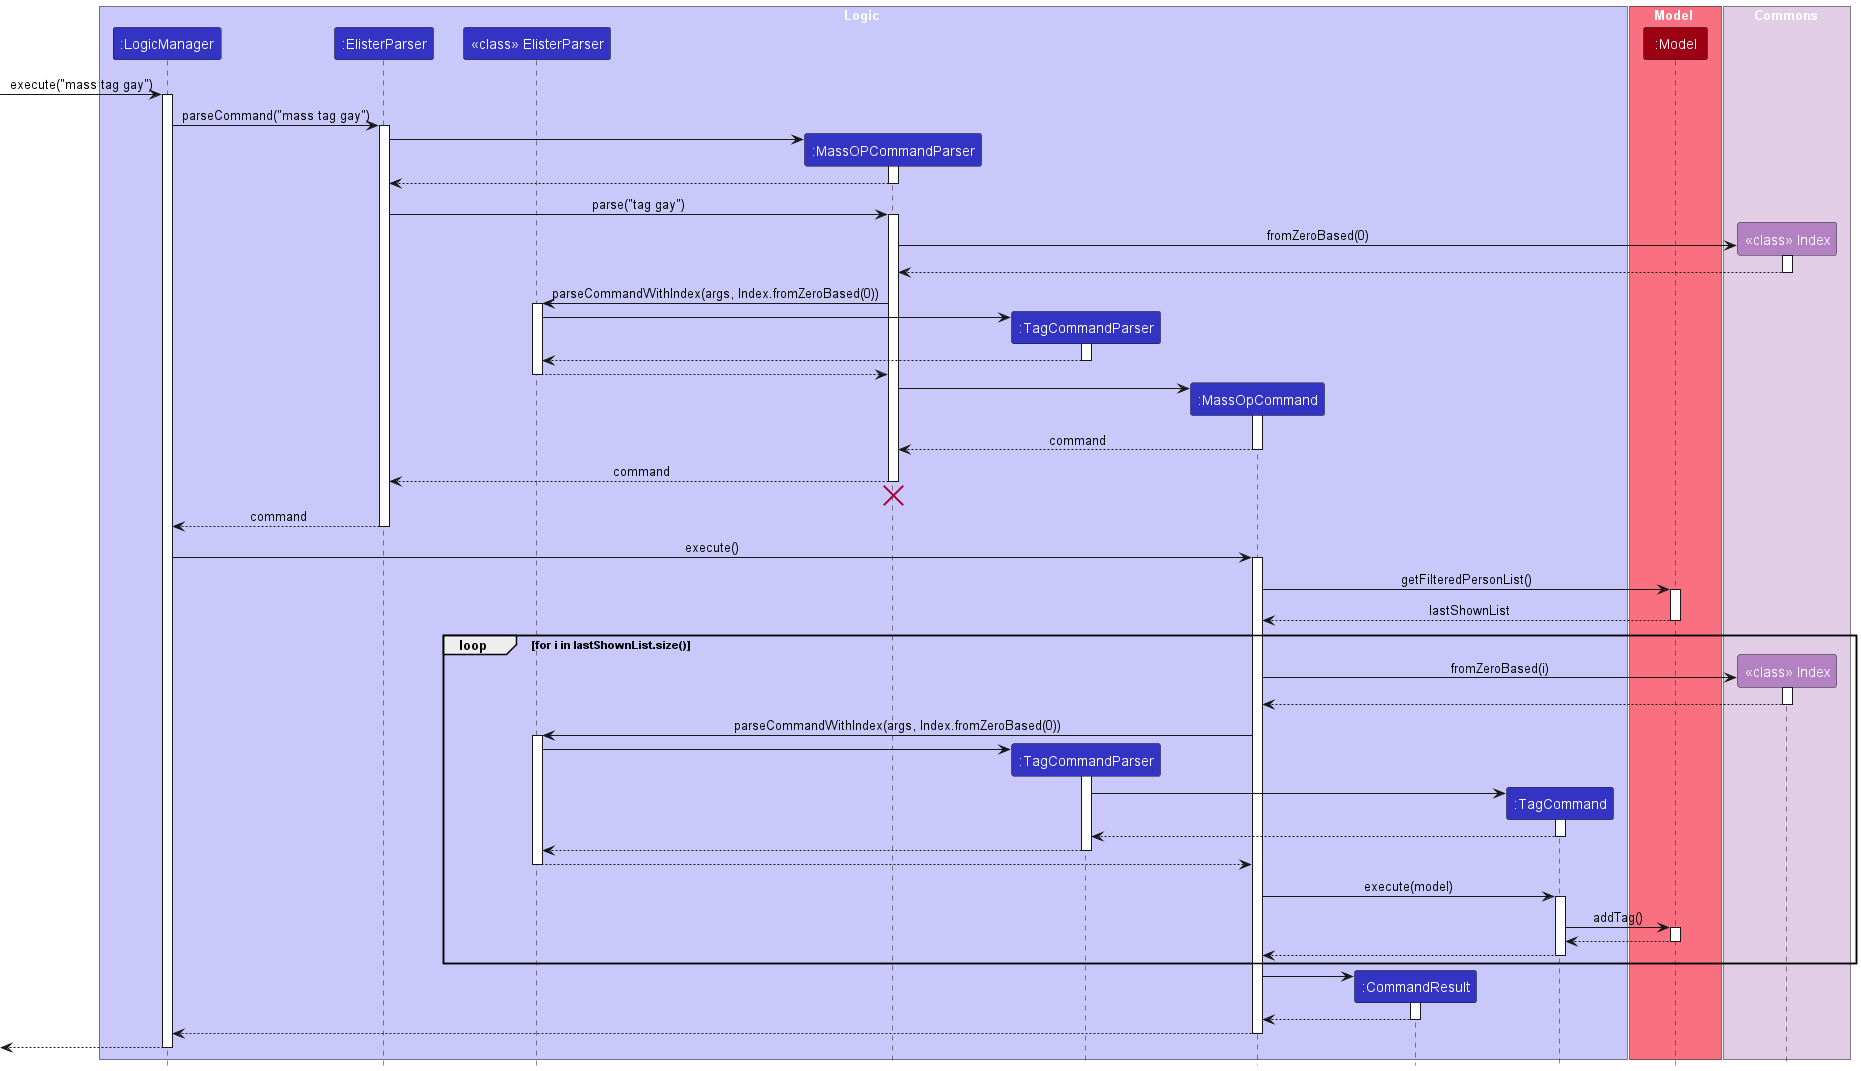
Given below is an example usage scenario and how the MassOp mechanism behaves at each step.
Step 1. The user launches the application for the first time. The VersionedELister will be initialized with the initial address book state, and the currentStatePointer pointing to that single address book state.
Step 2. The user executes mass tag good command to tag all the people in the address book with a new Tag good. The mass command creates tag command in a loop and each tag command calls Model#addTag(), causing the modified state of the address book after the mass tag good command executes to be saved in the eListerStateList, and the currentStatePointer is shifted to the newly inserted address book state. The end result is that
every person in the addressbook list is tag with good.
Documentation, logging, testing, configuration, dev-ops
Appendix: Requirements
Product scope
Target user profile: Insurance salesmen who want to obtain a list of contacts who meet a certain criteria.
Value proposition: tag, filter, and obtain contacts faster than a typical mouse/GUI driven app
User stories
Priorities: High (must have) - * * *, Medium (nice to have) - * *, Low (unlikely to have) - *
| Priority | As a … | I want to … | So that I can… |
|---|---|---|---|
* * * |
new user | see usage instructions | refer to instructions in case I forget how to use the App |
* * * |
user | add a potential customer | |
* * * |
user | delete a potential customer | remove entries that I no longer need |
* * * |
user | find a potential customer by name | locate details of persons without having to go through the entire list |
* * |
user | hide private contact details | minimize chance of someone else seeing them by accident |
* |
salsman with many potential customers in the E-Lister | sort potential customers by name | locate a potential customer easily |
* * * |
Insurance salesman | see usage instructions | Add someone to a category to manage them better |
* * * |
Insurance salesman | add the user’s income | tell whether he’s someone actually worth selling insurance to |
* * * |
Insurance salesman | delete all tags | reset all the data |
* * |
Insurance salesman | add the user’s income | tell whether he’s someone actually worth selling insurance to |
* * |
Insurance salesman | filter by traits (e.g. income level) | selectively target certain insurance products to people who are more likely to buy it |
* |
Insurance salesman | undo what I did | easily correct unecessary mistakes |
{More to be added}
Use cases
(For all use cases below, the System is the ELister and the Actor is the user, unless specified otherwise)
Use case: Delete a person
MSS
- User requests to list persons
- ELister shows a list of persons
- User requests to delete a specific person in the list
-
ELister deletes the person
Use case ends.
Extensions
-
2a. The list is empty.
Use case ends.
-
3a. The given index is invalid.
-
3a1. ELister shows an error message.
Use case resumes at step 2.
-
Use Case UC1: Tag a person
MSS
- User adds a tag with a specified label
-
ELister adds the tag to the person.
Use case ends.
Extensions
-
1a. The tag already exists for the given person.
-
1a1. ELister shows an info message.
Use case ends.
-
-
1b. The given index is invalid.
-
1b1. ELister shows an error message.
Use case ends.
-
{More to be added}
Non-Functional Requirements
- Should work on any mainstream OS as long as it has Java
11or above installed. - Should be able to hold up to 1000 persons without a noticeable sluggishness in performance for typical usage.
- A user with above average typing speed for regular English text (i.e. not code, not system admin commands) should be able to accomplish most of the tasks faster using commands than using the mouse.
- Should not lag much when undoing a previous move.
{More to be added}
Glossary
- Command-line interface: any changes to the state of the ELister is done via a text command
- Mainstream OS: Windows, Linux, Unix, OS-X
- Private contact detail: A contact detail that is not meant to be shared with others
Appendix: Instructions for manual testing
Given below are instructions to test the app manually.
Launch and shutdown
-
Initial launch
-
Download the jar file and copy into an empty folder
-
Double-click the jar file Expected: Shows the GUI with a set of sample contacts. The window size may not be optimum.
-
-
Saving window preferences
-
Resize the window to an optimum size. Move the window to a different location. Close the window.
-
Re-launch the app by double-clicking the jar file.
Expected: The most recent window size and location is retained.
-
-
{ more test cases … }
Deleting a person
-
Deleting a person while all persons are being shown
-
Prerequisites: List all persons using the
listcommand. Multiple persons in the list. -
Test case:
delete 1
Expected: First contact is deleted from the list. Details of the deleted contact shown in the status message. Timestamp in the status bar is updated. -
Test case:
delete 0
Expected: No person is deleted. Error details shown in the status message. Status bar remains the same. -
Other incorrect delete commands to try:
delete,delete x,...(where x is larger than the list size)
Expected: Similar to previous.
-
-
{ more test cases … }
Saving data
-
Dealing with missing/corrupted data files
- {explain how to simulate a missing/corrupted file, and the expected behavior}
-
{ more test cases … }
Appendix: Planned Enhancements
- Currently, the default parse failure message is displayed when
delete,delete_tag,undo, orredois called with an index argument which is non-positive, or greater thanInteger.MAX_VALUE, 2^31 - 1.
A common user complaint is that this leads to confusion, as it does not point out the index argument as a problem - in an often otherwise-correct command.
We plan to make these error messages mention this cause of failure:The index entered must be a positive integer below 2^31. - The Input Log displays commands entered in previous sessions identically to those entered this session.
This can cause confusion as theundocommand is able to revert the latter, but not the former, leading toundoappearing to fail on commands without an obvious reason.
We plan to color the Input Log text of commands entered in previous sessions light blue to distinguish them and indicate them as non-undoable. - The Input Log cannot be cleared from within the program, causing it to grow cluttered over time and
increasingly difficult to scroll. We plan to add a command
wipelogto clear the Input Log of its contents. - Command shortcuts cannot be deleted from within the program, making it difficult to remove an alias once
it is no longer required. We plan to add a command to delete such shortcuts:
delete_shortcut SHORTCUT. To avoid making commands inaccessible, shortcuts will only be deletable when more than one alias exists for the command in question; an error message shall be raised otherwise. - Fix the filters display to work properly after some commands like “undo”. For example, after 2 input “filter t/abc t/cde” and “filter t/mnb”, the Ui display the applying filters are “t/mnb”, but after a “redo” the Ui display no filters that are being applied while it supposes to show “t/abc” and “t/cde” to user.